


 Minecraft
Do you want to play on a map downloaded from the internet, recover a solo world, or replace the current world on your Minecraft server?
In this guide, we explain how to import a Minecraft map to your nitroserv server with FileZilla, then how to tell the server which world to load on startup.
Wait, let me rent one and I'll be right there
Quick Answer
To import a Minecraft map to your server:
- stop your server from the nitroserv Manager;
- get or download your Minecraft map;
- extract the archive if it's in
.zipor.rar; - verify that the map folder contains a
level.datfile; - if an old
worldfolder already exists, rename it toworld_oldorworld_original; - send the complete folder to the
/Minecraftfolder with FileZilla; - open the Configuration tab in the nitroserv Manager;
- modify the
level-nameparameter with the exact name of the folder you sent; - save, then restart your server.
**Warning: **the name specified in
level-namemust match exactly the name of your map folder.
Before You Start
Before importing a map, verify that you have:
- access to the nitroserv Manager;
- a configured SFTP access;
- FileZilla installed on your computer;
- your Minecraft map folder ready to send.
If you haven't configured FileZilla yet, you can follow our dedicated guide:
Also remember to stop your server before modifying its files. This prevents Minecraft from writing to the world while you're changing folders.
Step 1: Prepare Your Minecraft Map
If your map comes from the internet, it's often downloaded as a .zip, .rar, or .7z archive: start by extracting it on your computer.
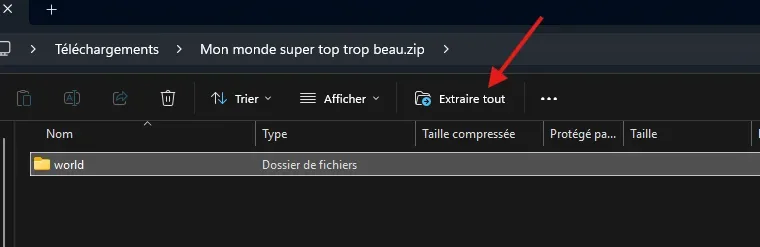
Once the archive is extracted, you should get a Minecraft world folder (often called world) containing a particular file:
level.dat
Example of correct structure:
world/level.dat
world/region/
world/playerdata/
Watch out for the classic pitfall: some archives create an extra folder.
An example of extra folders would be My super cool beautiful world/world/level.dat
In this case, the folder to send:
- will not be
My super cool beautiful world - will be world, which contains
level.dat
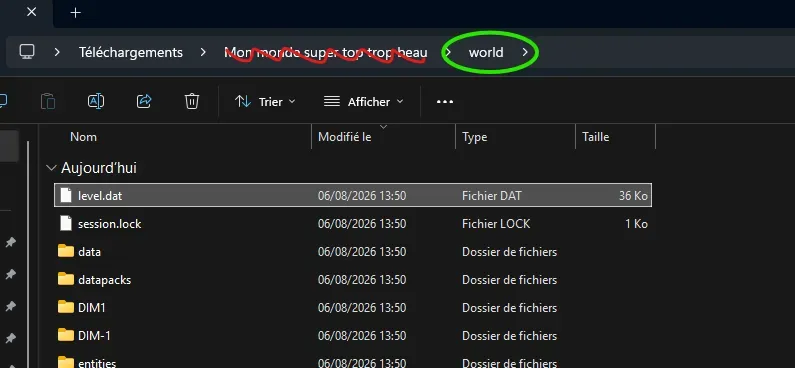
Minecraft doesn't look "a bit further just in case": it wants the right folder, directly.
Step 2: Stop Your Server
From the nitroserv Manager, in the top left of your dashboard, click Stop
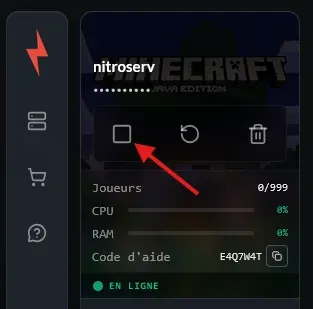
Wait for the server to be completely shut down: don't send your map while the server is running.
Even if "it might work", this is the kind of small risk that ends up with a world that won't load.
Step 3: Check if an Old World Already Exists
Open FileZilla and connect to your server with your SFTP access. In the /Minecraft folder, check if a world folder already exists.
In most cases, it's called world. If your new map is also called world, don't send it directly over the old folder: you risk mixing files from both worlds, and Minecraft might then load a broken, empty, or inconsistent world.
The cleanest method is to rename the old folder before sending your new map.
From FileZilla:
- right-click on the old
worldfolder; - click Rename;
- give it a name like
world_oldorworld_original
That way, your old world remains available if you need to go back.
You can also delete the old world folder if you're sure you don't need it anymore, but we recommend renaming it instead. It's safer, and it avoids the famous "wait, our base was in there, wasn't it?".
Step 4: Send the Map with FileZilla
Once you've verified that no old world with the same name risks being overwritten or mixed with your new map, we can continue the tutorial!
- Drag the complete folder of your map into the
/Minecraftfolder, or right-click thenUpload
- If your folder is called world, you should then have
/Minecraft/world/, with the famous level.dat inside: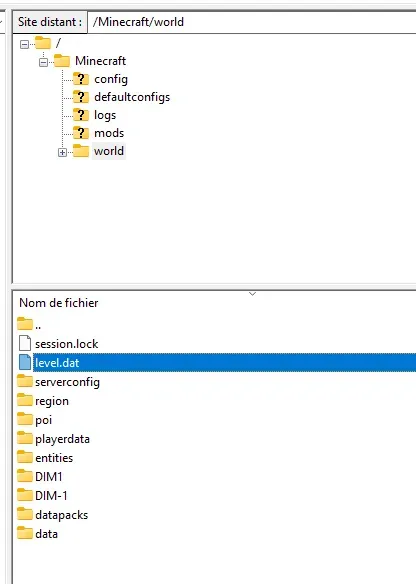
- If you instead see
/Minecraft/My super cool beautiful world/world/level.dat, then there's an extra folder: fix the file structure before starting your server.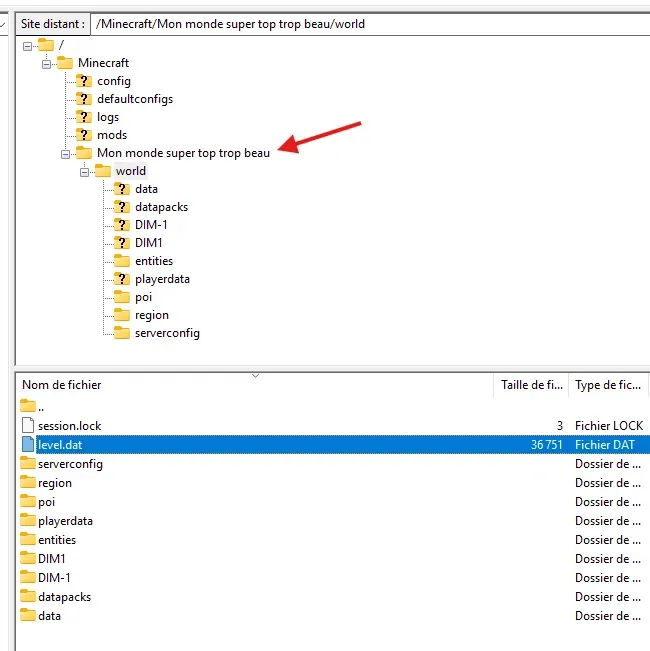
Step 5: Modify the level-name
Once the map is sent, go back to the nitroserv Manager.
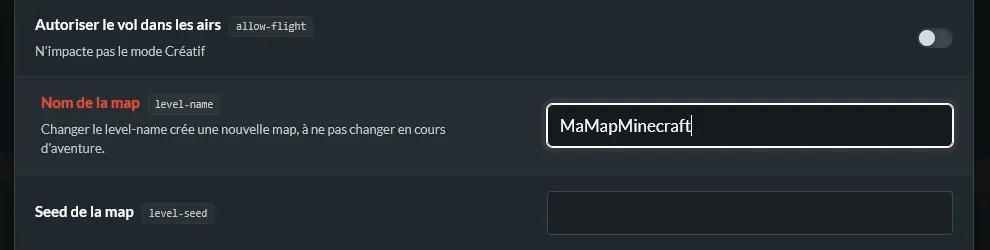
- open the Configuration tab;
- find the
level-nameparameter; - replace its value with the exact name of your map folder;
- click Save.
For example, if your folder is called MyMinecraftMap, then level-name should contain MyMinecraftMap
Respect uppercase letters, spaces, and special characters.
To avoid issues, we recommend using a simple name, for example world, map, survival, or MyMap.
Avoid long names or names filled with weird characters: Minecraft is already creative enough when it decides not to start.
Step 6: Restart the Server
Once the map is sent and level-name is modified:
- go back to your server's main page;
- start the server;
- wait for the startup to finish;
- connect in-game to verify that the correct map is loaded.
If everything is correct, your server now starts on the imported map.
Common Issues
The server generates an empty world
If your server generates a new world instead of loading your map, verify that:
- the name in
level-namematches exactly the folder name; - the map folder is indeed in
/Minecraft; - the
level.datfile is directly in the map folder; - there's no extra nested folder;
- you've saved the configuration;
- the server has been restarted.
The map won't start
If the server won't start after the import, verify that:
- the map is compatible with your Minecraft version;
- you're not trying to load a modded map on a Vanilla server;
- the map wasn't corrupted during transfer;
- the FileZilla transfer is complete;
- you sent the complete folder, not just a few files.
I can't find the level.dat file
If you don't see level.dat, you're probably not in the right folder.
Open the subfolders of your map until you find the one containing level.dat, then send that folder to your server.
Players don't appear in the right place
Some maps define their own spawn point. If players appear far from the intended area, you can check the spawn in-game or use appropriate Minecraft commands to set a new spawn point.
Key Takeaways
To import a Minecraft map, the most important thing is to send the right folder to /Minecraft, then enter its exact name in level-name.
The map folder must directly contain the level.dat file. If this file is hidden in a subfolder, Minecraft might generate an empty world instead of loading your map.
__
Need Help?
If your map won't load, if your server generates an empty world, or if it doesn't restart correctly after the import, we're available on our Discord or via our Twitter account!
You can also contact us directly via ticket from your nitroserv Manager.


